Khaos Control Cloud Accounts Setup Guide
Introduction to Khaos Control Cloud Account Setup
This setup guide is designed to help you setup your accounts in Khaos Control Cloud. Setting up your accounts is key for the system to work as you require.
This guide covers:
• User Permissions
• System Values for accounts
• Setting up your sales nominal
• Setting up your bank account
• Entering Opening Balances
• Entering your Trial Balance
Please read this guide before attempting to make any changes.
If you have any questions, please contact training@khaoscloud.com. There is also an in-built Help functionality which can be accessed by clicking on the help button in the top right-hand corner of the application, or by clicking on the Help button at the bottom of the Navigation Bar. The Help menu is context-sensitive and will display relevant information depending on where you are within Khaos Control Cloud.
The information includes:
- A description of the main page you are using.
- Information on the fields within the current screen.
- A list of related videos which will guide you through important tasks related to the screen that you are on.
There are tooltips available to describe each option, just hover your mouse above the option to display the information associated with it.
System Setup
User List Once your users have been setup via the Admin Panel, you will need to configure their permissions so that they can use the accounts area of the system.
1. Open System Setup.
2. Click on User List.
3. Double-click on the person in the list who you wish to configure as having permission to access and use the accounts.
4. In the User Permissions dialog scroll down until you reach the Accounts section.
5. Make sure that the following options are enabled, i.e. the toggle is green:
a Accounts area:
i Open
ii Edit
iii Ledger
iv SLedger
6. Enable other options as appropriate.
7. Click on the OK button.

Notes:
• If you have already created a user with accounts permissions, you can use the Copy From button to copy the permissions.
• If a user has Admin permission, this automatically gives them access to the accounts area.
System Setup – System Values - General
The General screen in System Values is where you add information about your company for example the address, VAT number etc.
To edit the accounts options in System Values:
1. Open System Setup.
2. Click on System Values.
3. When System Values opens the General tab is displayed.
4. Click on the Edit button in the top right.
a There are options in this screen that you must ensure are configured for your business:
• In the Company Details area:
o Vat Number
o Registered number
o Registered Office
o EC number if required
• In the Financial Setup area:
o Ledger Currency
o Year Month End
o VAT Country
5. Once you are happy with the setting, click on the Accounts tab at the top.
6. Check the options in this screen and update if required. Remember that if you are not sure about an option, please check the tooltips as they explain what the options mean. If you still need help, then contact training@khaoscloud.com.
7. Once you are happy with your configuration, save the changes using the Save Screen button in the top right.
Sales Nominal Setup
At the point when sales orders are issued in the [Despatch | Sales Invoice Manager] screen, the system updates the accounts with the value of the sale. This is reported on in the Profit and Loss report in Accounts where you can see a monthly breakdown of your sales. By default, a sales nominal has already been setup, and this is linked to all countries. However, if you would like to breakdown your sales using other options, then this is possible. Historically companies have often set up different nominals for different products or groups of products for reporting purposes, as this was the only way of analysing their sales in a purely accounting package. For example, a nursery might set up different nominals for prams, highchairs, and cots. This is not necessary with Khaos Control Cloud, as the reporting functionality allows you to breakdown your sales to a much finer degree. You may wish to stick with one sales nominal, although in practice companies may still have several, for example UK Sales, EU sales and Rest of the World Sales. One benefit of having fewer nominals is that they are much easier to manage.
Configuring your Sales Nominal To configure your sales nominal:
1. Open Accounts.
2. Click on Nominal Accounts Set-up.
3. Click on the Edit button in the top right.
4. Click on the New button in the top right. This will add a new line to the bottom of the grid.
5. You can either leave the nominal code as the consecutive number generated, or alternatively you can overwrite this to a specific code you want.
6. Add a description for the new nominal.
7. Leave the System Type as Sales.
8. The Account Type is where in the system you wish to map, or link, the nominal to. For details of how this works please see below.
9. Once you have selected your Account Type from the drop down, click on the Save Screen button in the top right.
Account Type when Setting up your Sales Nominals
The Account Type that you use with your sales nominal is based on a hierarchy which is:
1. Company
2. Stock Item
3. Level 2 Stock Type
4. Countries
Scenario:
• You sell a golf club, some golf balls, and a golf trolley.
• You have mapped (linked) your sales to the Countries Sales Nominal – remember this is the default.
• The Sales Order is issued in Sales Invoice Manager in the Despatch area of the system. This is the point at which the system updates the accounts, stock levels and customer statements. The system will look at the details of each sales order and decide which nominal the sale should be mapped to. The first place it will look is:
1. Company – is the sales nominal mapped to the customer who has bought the items?
a. Yes – then the sale will be added to this sales nominal.
b. No – the system will look to the next sales nominal in the process, in this scenario the answer is no.
2. Stock Item – is the sales nominal mapped to the individual stock item on the sales order?
a. Yes – then the sale will be added to this sales nominal.
b. No – the system will look to the next sales nominal in the process, in this scenario the answer is no.
3. Level 2 Stock Type - is the sales nominal mapped to the Level 2 Stock Type that the individual
stock items on the sales order belong to?
a. Yes – then the sale will be added to this sales nominal.
b. No – the system will look to the next sales nominal in the process, in this scenario
the answer is no.
4. Countries – is the sales nominal mapped to the Country and is the invoice address of the customer that bought the items in that country?
a. Yes – then the sale will be added to this sales nominal, in this scenario the answer is Yes, so the sale will be added into the Countries Sales nominal.
b. No – the system will look to the next sales nominal in the process If the system cannot find a sales nominal by this stage, then an error will be displayed, and the invoice will not be issued.
How to Map your Account Type Nominals
This section explains how to map your sales nominal to the different areas of the system. The sales nominal will only appear in the drop down if the Account Type has been linked to that area. If it does not appear, then you have not linked the original nominal correctly.
Company
If you select Company for your sales nominal you will have to link ALL relevant companies to this sales nominal.
To do this:
1. Open the Company item.
2. Open the Financial screen.
3. Click on the Edit button in the top right.
4. Select the sale nominal from the SNominal drop down in the Account Posting section in the bottom right of the screen.
5. Click on the Save Screen button in the top right.
Stock Item
This is normally used where you have a stock item that you sell, and you wish to keep the sales separate from all your other stock items, for example a service.
If you select Stock Item in the Account Type then, after saving the nominal setup screen, you will need to:
1. Open the stock item.
2. Click on the Edit button in the top right.
3. Select the sale nominal from the Sale Nominal drop down in the Accounting section at the top of the screen.
4. Click on the Save Screen button in the top right.
Level 2 Stock Type
If you selected Level 2 Stock Type for your sales nominal, you would need to link this with the Level 2 Stock Type or Types.
To do this:
1. Click on System Setup.
2. Open System Data.
3. Double click on Level 2: Type.
4. Click on the Edit button in the top right.
5. Select the sale nominal from the Sale Nominal drop down for the Level 2 Stock Types you wish the sale to be posted for.
6. Click on the Save Screen button in the top right.
Countries
By default, the sales nominal is mapped to Countries. However, you may wish to break this down into regions, for example Sales UK, Sales EU or Sales RoW.
1. Click on System Setup.
2. Open System Data.
3. Double click on Countries.
4. Click on the Edit button in the top right.
5. Select the sale nominal from the Sale Nominal drop down for the Country you wish the sales
nominal to be used for.
6. Repeat for all countries.
7. Click on the Save Screen button in the top right.
Notes:
• Sales nominals work against the invoice address not the delivery address.
• Do not mix and match your sales nominals.
Bank Account Setup
On a new system there are no banks setup and for it to work you need to setup your bank accounts.
There are two steps:
1. Create the Bank Nominal in Nominal Accounts Setup
2. Create the Bank Account in System Data and link it to the bank nominal
Create the Bank Nominal
1. Open Accounts -> Nominal Accounts Setup
2. Click on the Edit button in the top right.
3. Click on the New button just under the Edit button. This will add a new line in the grid.
4. Add the Code for the new bank nominal.
5. Add a description for the new bank nominal.
6. In the System Type column (third one along), click on the drop-down and select Bank Control Account.
7. Click on the Save Screen button in the top right.
Create the Bank Account
1. Open System Setup -> System Data -> Bank Accounts
2. Click on the Edit button in the top right.
3. Click on the New button just under the Edit button. This will add a new line in the grid.
4. Add a description for the new bank account. This is what will be shown in the list of bank accounts in the drop-down list in the Bank Account screen.
5. In the Currency column (third one along), click on the drop-down and select the currency that the bank will be used for.
6. In the BNominal column, use the drop down to select the bank nominal that you just created.
7. Fill in the rest of the detail as required, although this is optional.
8. Click on the Save Screen button in the top right.
Notes:
• You will need one bank for each of the currencies that you trade in when using Khaos Control Cloud.
• If you have companies that trade in more than one currency you must make the decision which is the currency they will be using on Khaos Control. A company can only trade in one currency.
Using Currencies
Currencies are setup and maintained in System Data.
1. Open System Setup -> System Data.
2. Double click on Currencies.
Conversion Rates -This is where the types of currencies that you trade in are setup.
1. Open System Setup -> System Data.
2. Double click on Currency Conversions.
This screen is where you configure your currency conversion rates per currency. You only need to setup the rate one way i.e. Pounds Sterling to Euro along with the rate in the Factor column and the date it is valid to. The help text explains the conversion rate that you have setup.
Entering Opening Balances
If you have account customers, customers with credit notes or suppliers who you owe money to, or with whom you have a credit note, then you will need to enter this information into the system.
To do this, you will need to create two new nominals as follows:
Creating the Opening Balance Nominals
1. Open Accounts -> Nominal Accounts Setup
2. Click on the Edit button in the top right.
3. Click on the New button just under the Edit button two times. This will add two new lines in the grid.
4. On the first new line:
a. Add the Code for the Customer Opening Balance nominal, for example CUOB.
b. Add a description, for example Customer Opening Balance.
c. In the System Type column (third one along), click on the drop-down and select Customer Opening Balances (it is at the bottom of the list).
d. In the Account Type column, click on the drop down and select Company.
5. On the second new line:
a. Add the Code for the Supplier Opening Balance nominal, for example SUOB.
b. Add a description, for example Supplier Opening Balance.
c. In the System Type column (third one along), click on the drop-down and select
Supplier Opening Balances (it is at the bottom of the list).
d. In the Account Type column, click on the drop down and select Company.
6. Click on the Save Screen button in the top right.
Entering Opening Balances
Both customer and supplier opening balances are entered in the same dialog:
1. Open Accounts -> Trial Balance.
2. Click on the Actions button in the top right.
3. Select Enter Opening Balances. The Opening Balance dialog is displayed:
4. Click on the new sheet button to the right of the Company field, new sheet.
5. Filter for the customer or supplier you wish to enter the opening balance for.
6. Enter the invoice code. We suggest prefixing the invoice code with OB so that when you are looking back through your accounts you can immediately see which entries were added as an opening balance.
7. Enter the total amount of the invoice.
8. Enter the date of the invoice.
9. From the Nominal drop down select either the Customer or Supplier Opening Balance nominal as appropriate. If you cannot see the nominals you created in the drop down, sign
out and then back into the system.
10. If the entry is for a credit note, i.e. you owe the customer, or the supplier owes you, then change the toggle to green.
11. Change the Tax Rate if appropriate.
12. If you are accounting for the Tax in your old system, then leave this toggle off. If you wish the Tax to be accounted for in the Khaos Control Cloud Tax Register, then set this toggle to on.
13. Update the currency as required.
14. Click on the Post Transaction button to update the accounts with the opening balance.
15. Continue to add all your opening balances.
There are two help buttons, Nominal Acct Help and Tax Help which explain the relevant options
when entering the opening balances.
8. Moving your Old Trial Balance into Khaos Control Cloud
The following example shows you how you move the old accounts information from your old system
into Khaos Control Cloud. Below is the information from the old system which we want to add into
Khaos Control.
Step One – Nominals that will be used
Besides some of the system nominals, the following nominals will be required for this process.
The nominals in blue will need to be created, if you haven’t already done so.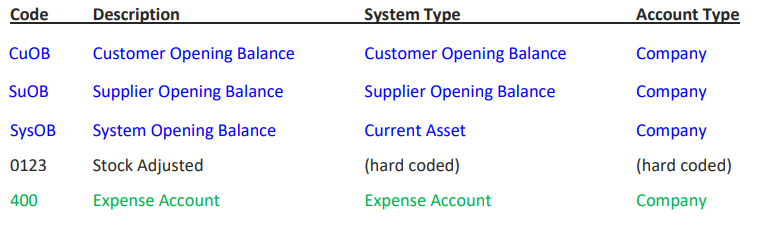
The Stock Adjusted nominal already exists in the system.
Where we have listed an expense nominal in green, for your accounts this would be broken down
and you would create individual expense nominals for tea and coffee, printing, rent, salaries etc.
Step Two - Enter all customer Opening Balances
Follow the process as described in Entering Opening Balances above to enter £223.00 from the
Debtors column in the above example.
Step Three - Enter all Supplier Opening Balances
Follow the process as described in Entering Opening Balances above to enter £414.00 from the
Creditors column in the above example.
After refreshing the Trial Balance will look like this:
Step Four – Adjust the Stock in
You will need to adjust the quantity of stock into the system, in doing so this will update the stock nominal. To do this you must have either imported or manually created your stock in the system along with the stock value. This is very important as this is the value that the system will use when updating the stock nominal. In our example above, this is £100 of stock.
1. Open Stock Tools -> Stock Adjustments
2. Click on the Edit button in the top right.
3. Add a reason for the adjustment, for example entering opening stock. This is important if you need to track back later.
4. Make sure the Adjust Type is set to Stock Update.
5. Click on the blue +New button to the top right of the grid.
6. Add all the stock that you wish to adjust into the grid.
7. Update the quantities.
8. Click on the Save Stock Adjustments button in the top right.
The Trial Balance looks like this:
System Opening Balance Nominal
We are now going to use the [SysOB] System Opening Balance nominal to journal against the remaining nominals to complete the trial balance.
Step Five – Enter Purchase delivery
1. Open Accounts -> Journal
2. Click on the Edit button in the top right.
3. Enter the date for the journal.
4. Enter a note for the journal.
5. Click on the blue +New button to the top right of the grid.
6. Add the Purchase Delivery Nominal.
7. Click on the blue +New button to the top right of the grid.
8. Add the System Opening Balance nominal.
9. Enter the Debit amount, in this case £20.00 against the Purchase Delivery nominal.
10. Enter £20.00 in the Credit column against the System Opening Balance nominal.
11. Click on the Save Journal button in the top right to post the information to the accounts.
Step Six – Enter Sales delivery
1. Open Accounts -> Journal.
2. Click on the Edit button in the top right.
3. Enter the date for the journal.
4. Enter a note for the journal.
5. Click on the blue +New button to the top right of the grid.
6. Add the Purchase Delivery Nominal.
7. Click on the blue +New button to the top right of the grid.
8. Add the System Opening Balance nominal.
9. Enter the Debit amount, in this case £10.00 against the System Opening Balance nominal.
10. Enter £10.00 in the Credit column against the Sales Delivery nominal.
11. Click on the Save Journal button in the top right to post the information to the accounts.
Step Seven – Add the Stock Cost of Sale
1. Open Accounts -> Journal
2. Click on the Edit button in the top right.
3. Enter the date for the journal.
4. Enter a note for the journal.
5. Click on the blue +New button to the top right of the grid.
6. Add the Purchase Delivery Nominal.
7. Click on the blue +New button to the top right of the grid.
8. Add the System Opening Balance nominal.
9. Enter the Debit amount, in this case £200.00 against the Stock COS nominal.
10. Enter £200.00 in the Credit column against the System Opening Balance nominal.
11. Click on the Save Journal button in the top right to post the information to the accounts.
Step Eight – Enter the Bank Opening Balance
1. Open Accounts -> Journal
2. Click on the Edit button in the top right.
3. Enter the date for the journal.
4. Enter a note for the journal.
5. Click on the blue +New button to the top right of the grid.
6. Add the Bank Account Nominal.
7. Click on the blue +New button to the top right of the grid.
8. Add the System Opening Balance nominal.
9. Enter the Debit amount, in this case £246.00 against the Bank Account nominal.
10. Enter £246.00 in the Credit column against the System Opening Balance nominal.
11. Click on the Save Journal button in the top right to post the information to the accounts.
Step Nine – Enter the Sales Opening Balance
1. Open Accounts -> Journal
2. Click on the Edit button in the top right.
3. Enter the date for the journal.
4. Enter a note for the journal.
5. Click on the blue +New button to the top right of the grid.
6. Add the Sales Nominal.
7. Click on the blue +New button to the top right of the grid.
8. Add the System Opening Balance nominal.
9. Enter the Credit amount, in this case £400.00 against the Sales nominal.
10. Enter £400.00 in the Debit column against the System Opening Balance nominal.
11. Click on the Save Journal button in the top right to post the information to the accounts.
Step Ten - Enter the Expense Accounts (Phone bills, utilities, rent etc) Opening Balance
1. Open Accounts -> Journal
2. Click on the Edit button in the top right.
3. Enter the date for the journal.
4. Enter a note for the journal.
5. Click on the blue +New button to the top right of the grid.
6. Add the Purchase Delivery Nominal.
7. Click on the blue +New button to the top right of the grid.
8. Add the System Opening Balance nominal.
9. Enter the Debit amount, in this case £25.00 against the expense nominal, in the example this
is Office Consumables nominal.
10. Enter £25.00 in the Credit column against the System Opening Balance nominal.
11. Click on the Save Journal button in the top right to post the information to the accounts.
Step Eleven - Check all the old trial balance has been entered
You can check that all has been entered correctly by opening the Trial Balance and green selecting all the nominals from your original trial balance, for example:
Step Twelve – Clear Down the Opening Balance Nominals
The next stage of the process is the clear down all the opening balance accounts that we used for the double entry to zero (Customer, Supplier, System and Stock Adjusted).
Clear Down the Customer Opening Balance Nominal
1. Open Accounts -> Journal
2. Click on the Edit button in the top right.
3. Enter the date for the journal.
4. Enter a note for the journal.
5. Click on the blue +New button to the top right of the grid.
6. Add the System Opening Balance nominal.
7. Click on the blue +New button to the top right of the grid.
8. Add the Customer Opening Balance nominal.
9. Create a journal that will clear down the Customer Opening Balance nominal, in this example:
a. Debit Customer Opening Balance by £233.00
b. Credit System Opening Balance by £233.00.
10. Click on the Save Journal button in the top right to post the information to the accounts.
Clear down the Supplier OB nominal
1. Open Accounts -> Journal
2. Click on the Edit button in the top right.
3. Enter the date for the journal.
4. Enter a note for the journal.
5. Click on the blue +New button to the top right of the grid.
6. Add the System Opening Balance nominal.
7. Click on the blue +New button to the top right of the grid.
8. Add the Customer Opening Balance nominal.
9. Create a journal that will clear down the Customer Opening Balance nominal, in this example:
a. Debit System Opening Balance by £414.00
b. Credit Supplier Opening Balance by £414.00.
10. Click on the Save Journal button in the top right to post the information to the accounts.
Clear down the Stock Adjusted OB nominal
1. Open Accounts -> Journal
2. Click on the Edit button in the top right.
3. Enter the date for the journal.
4. Enter a note for the journal.
5. Click on the blue +New button to the top right of the grid.
6. Add the System Opening Balance nominal.
7. Click on the blue +New button to the top right of the grid.
8. Add the Stock Adjusted nominal.
9. Create a journal that will clear down the Customer Opening Balance nominal, in this example:
a. Credit System Opening Balance by £100.00
b. Debit Stock Adjusted by £100.00.
10. Click on the Save Journal button in the top right to post the information to the accounts.
Checking that the Trial Balance has been entered correctly
Once you have cleared down the accounts, check the Trial Balance to make sure that the opening balances have been entered correctly and the totals match those of your previous accounting system.
End of Financial Year Accounts Clear Down
At the end of each financial year you will need to clear down your accounts. This clears all the accounts in the Profit and Loss and posts the balance into the Retained Earnings nominal. To perform the clear down:
1. Open Accounts, then Balance Sheet Report.
2. From the Actions menu in the top right select Accounts Clear Down (Year End).
3. In the dialog enter the dates from and to for the financial year that you are clearing down.
4. Click on the Continue button.
5. In the Review dialog:
a. Click the Yes button to acknowledge that once this operation is performed it cannot be undone.
b. Click the Yes button to confirm the dates for the clear down.
c. Click the Continue button.
6. The system will display a message informing you that the clear down for the dates you entered is now complete.
7. Click the Yes button and then the Continue button.
You must have reconciled all your bank accounts for the period you are clearing your accounts for.